Creating a distribution list in Exchange Online is an essential skill for anyone looking to enhance email communication within their organization. A distribution list (DL) enables you to send emails to a group of people using a single email address, simplifying communication for teams and departments. In this extensive guide, we’ll walk you through the process of creating a distribution list using both the Exchange Admin Center and PowerShell. We will also cover best practices and common pitfalls to avoid.
Table of Contents
What is a Distribution List?
A distribution list is a collection of email addresses grouped under a single alias. When you send an email to this alias, all members of the distribution list receive the message. This feature is particularly useful for:
- Teams: For project-based communication.
- Departments: Such as HR, Marketing, or IT.
- Events: To keep all participants informed.
Why Use Distribution Lists?
- Time-Saving: Sending a single email to a distribution list saves time compared to addressing individual emails to multiple recipients.
- Enhanced Collaboration: A DL fosters teamwork by keeping everyone in the loop on important communications.
- Improved Organization: Distribution lists help manage communications effectively, especially in larger organizations with numerous teams.
- Flexibility: Easily add or remove members as team dynamics change.
How to Create a Distribution List
Method 1: Using the Exchange Admin Center (Portal)
Follow these detailed steps to create a distribution list via the Exchange Admin Center:
Step 1: Log in to Office 365
- Navigate to office.com.
- Sign in with your admin credentials. Ensure that you have the necessary permissions to create distribution lists.
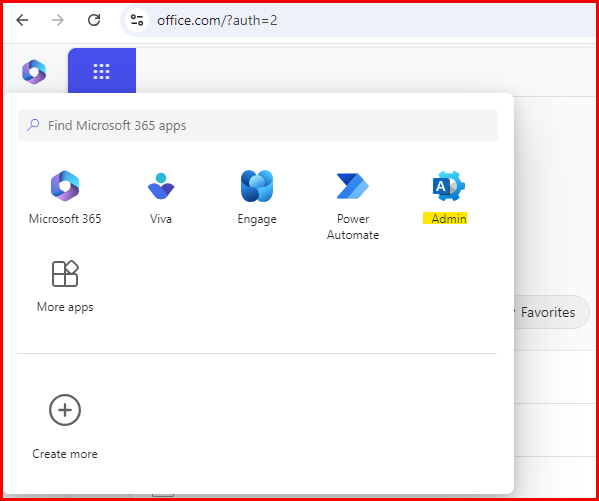
Step 2: Access the Exchange Admin Center
- Click on the Admin icon from the app launcher.
- In the left sidebar, expand Admin centers and select Exchange. This will take you to the Exchange Admin Center.
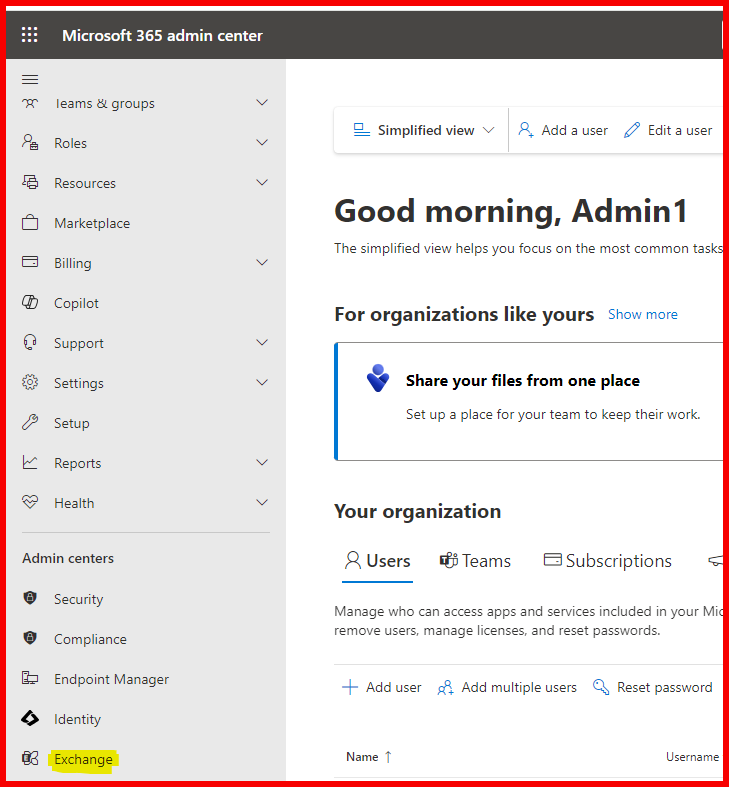
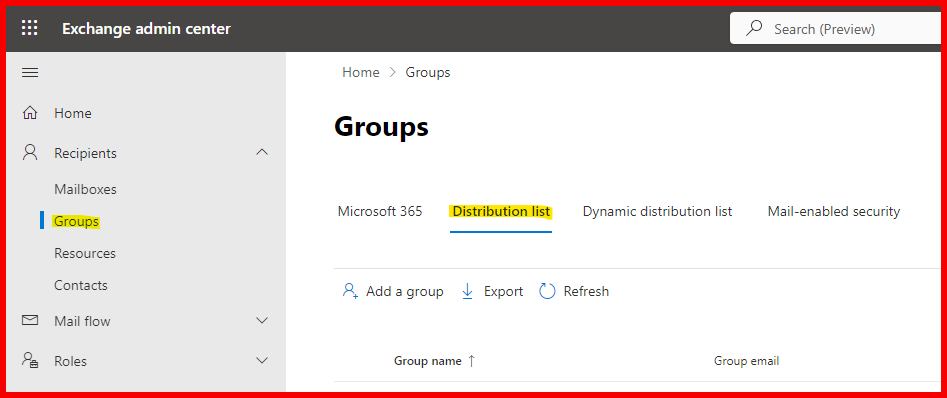
Step 3: Navigate to Recipients
- In the Exchange Admin Center, click on Recipients in the left sidebar.
- Select Groups. This will display a list of all existing groups, including distribution lists.
Step 4: Create a New Group
- Click on the + Add a group button at the top of the page.
- In the pop-up window, select Distribution as the group type and click Next.
Step 5: Fill in Group Details
- Name: Enter a clear and descriptive name for your distribution list (e.g., “Project Alpha Team”).
- Description: You can add a description to clarify the purpose of the group (optional but recommended).
- Email Address: Specify the email address for the distribution list (e.g., projectalpha@yourdomain.com).
Step 6: Set Group Ownership
- Owners: Assign one or more owners who will manage the group. Owners have permissions to add or remove members and modify group settings.
- Click Next to proceed.
Step 7: Add Members
- You can add members immediately or skip this step to do it later.
- To add members, click on the + Add button.
- Search for and select users from the directory.
- Click Add for each selected user, then click OK to confirm.
Step 8: Review and Create
- Review your settings. Ensure everything is correct before proceeding.
- Click Create. After a brief moment, you’ll receive a confirmation message indicating that the group was created successfully.
- Click Close to finish the process.
Method 2: Using PowerShell
For those who prefer command-line management, PowerShell offers a quick and efficient way to create a distribution list. If you haven’t set up PowerShell yet, you can follow this guide: How to Install and Connect Exchange Online using PowerShell.
Step 1: Open PowerShell
- Launch PowerShell on your computer. Make sure it is running with administrative privileges.
Step 2: Connect to Exchange Online
- Use the following command to connect:
Connect-ExchangeOnline -UserPrincipalName your_admin@domain.com- Replace
your_admin@domain.comwith your actual admin email address. You may be prompted to enter your password.
Step 3: Create a New Distribution List
- Use the following command to create a new distribution list:
New-DistributionGroup -Name "Your DL Name" -PrimarySmtpAddress "YourDLAlias@domain.com" -ManagedBy "owner@domain.com"- Replace
"Your DL Name","YourDLAlias", and"owner@domain.com"with your desired values.
Example Command
To create a distribution list named “Sales Team” with the alias “salesteam” and managed by “manager@yourdomain.com”, use:
New-DistributionGroup -Name "Sales Team" -PrimarySmtpAddress "sales@sipme.tech" -ManagedBy "admin1@sipme.tech" -Members "alice@sipme.tech", "bob@sipme.tech"
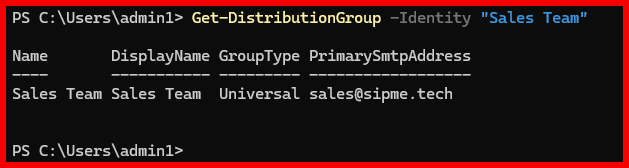
Step 4: Verify Creation
- To check if the distribution list was created successfully, run:
Get-DistributionGroup -Identity "Sales Team"- This command will display details about the newly created distribution list.
Managing Distribution Lists
Adding Members to a Distribution List
Method 1: Using the Exchange Admin Center
- Access the group settings as previously described.
- Click on Edit for the specific distribution list.
- Navigate to Members, then click on + Add to include new members.
- Search for and select the users, then click Add and OK.
- Finally, click Save to apply changes.
Method 2: Using PowerShell
To add a member using PowerShell, use:
Add-DistributionGroupMember -Identity "Sales Team" -Member "newmember@yourdomain.com"Removing Members from a Distribution List
Method 1: Using the Exchange Admin Center
- Access the distribution list settings.
- Go to Members, select the member you wish to remove, and click – Remove.
- Click Save to apply changes.
Method 2: Using PowerShell
To remove a member from a distribution list, use:
Remove-DistributionGroupMember -Identity "Sales Team" -Member "member@yourdomain.com"Best Practices for Distribution Lists
- Regularly Review Membership: Periodically audit the members of your distribution lists to ensure they reflect current team structures and responsibilities.
- Use Descriptive Names: Choose names that clearly indicate the group’s purpose. This makes it easier for users to find and understand the groups.
- Limit Group Size: While it might be tempting to create large distribution lists, try to keep them focused to avoid overwhelming members with too many emails.
- Monitor Activity: Keep track of how often the distribution list is used. This will help you gauge its effectiveness and whether it needs to be restructured.
Conclusion
Creating a distribution list in Exchange Online is a straightforward process that can greatly enhance communication within your organization. Whether you opt for the Exchange Admin Center or PowerShell, the ability to create and manage distribution lists is a vital tool for improving team collaboration and efficiency.
For more helpful guides and resources, be sure to explore our website: Geekers Hub. If you have any questions or need further clarification, feel free to contact us.
External Resources
- For further details on managing distribution groups, visit the Microsoft Docs page on Exchange Online.