In the modern workplace, effective communication is essential, especially when you’re unavailable to respond to emails. Microsoft Exchange Online provides tools that enable users to set up out-of-office (OOO) replies, which help keep colleagues and clients informed of your absence. Whether you’re on vacation, at a conference, or dealing with personal matters, having an automatic reply set can greatly enhance your professionalism and efficiency. In this guide, we will cover both the Exchange Admin Center (EAC) and PowerShell methods for setting up out-of-office replies, including detailed instructions, examples, and best practices. In this, we will cover how to set Set Out-of-Office in Exchange Admin Center and PowerShell both ways.
Table of Contents
Why Use Out-of-Office Replies?
Imagine you’re a project manager who will be attending an important week-long business trip. During this time, you may not have access to your email or the opportunity to respond promptly. Setting an out-of-office message ensures that colleagues and clients are aware of your unavailability, thereby managing their expectations about response times.
Benefits of Setting Out-of-Office Replies:
- Professionalism: It demonstrates a commitment to communication and helps maintain a positive image.
- Time Management: By managing expectations regarding response times, you reduce the likelihood of follow-up emails that may clutter your inbox.
- Alternative Contacts: You can provide information for colleagues who can assist in urgent matters, ensuring that important issues are addressed even in your absence.
Method 1: Setting Out-of-Office Replies via Exchange Admin Center
Step 1: Access the Exchange Admin Center
To get started, you need to access the Exchange Admin Center:
- Log in to your Microsoft 365 account using your admin credentials.
- Click on the Admin Center from the app launcher.
- In the left-hand navigation pane, select Show All, then choose Exchange to open the Exchange Admin Center.
Step 2: Locate the Recipient’s Mailbox
- In the EAC, navigate to Recipients in the left menu.
- Click on Mailboxes to view a list of all user mailboxes in your organization.
- Use the search bar to find the specific mailbox for which you want to set the out-of-office reply. Click on the user’s name to open their properties.
Step 3: Edit Mailbox Features
- In the properties pane, select Others.
- Click on Manage automatic replies.
Step 4: Configure Out-of-Office Replies
- Click on Manage Automatic replies (refer image 1.2).
- Toggle Automatic replies on to enable the feature (refer image 1.2).
- Optionally, specify a time period for the automatic replies by checking the box for Send replies only during this time period. Set your desired start and end dates for the out-of-office message.
- Enter your OOO messages:
- Internal Message: This message will be sent to colleagues within your organization.
- External Message: This message will be sent to users outside your organization, such as clients and vendors.
- Click Save to apply your settings.
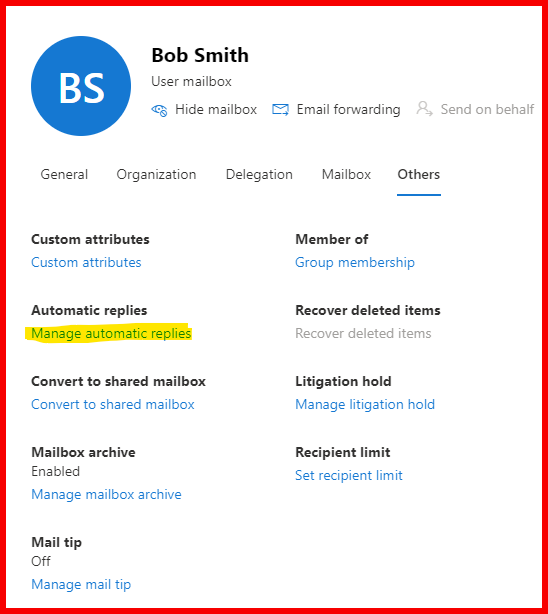
Image 1.1
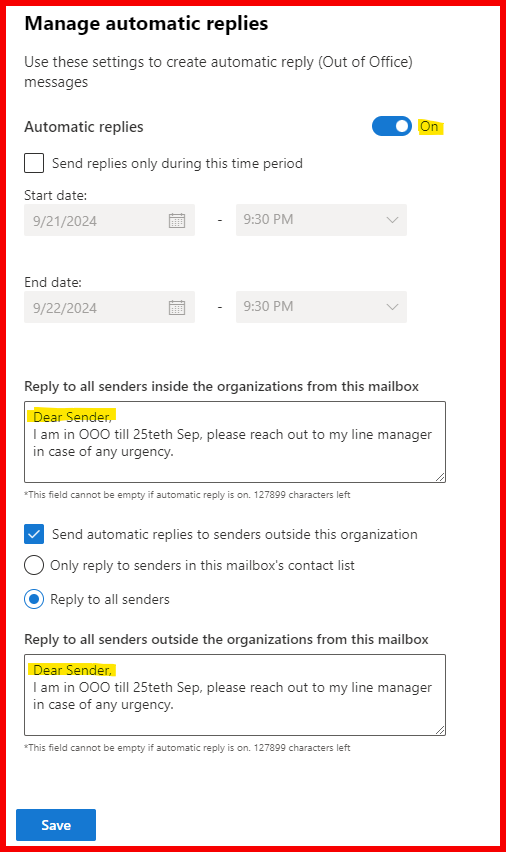
Image 1.2
Step 5: Verify the Configuration
Once you’ve set the automatic replies, send test emails from both internal and external accounts to ensure that the OOO messages are functioning correctly.
Method 2: Setting Out-of-Office Replies Using PowerShell
PowerShell offers a powerful alternative for those comfortable with command-line interfaces. This method is particularly useful for administrators managing multiple mailboxes or needing to automate the process.
Step 1: Connect to Exchange Online PowerShell
Before setting up automatic replies, you need to connect to Exchange Online. If you’re unfamiliar with how to do this, refer to my previous blog post on How to Install and Connect Exchange Online using PowerShell for detailed instructions.
After installing the Exchange Online Management module, connect using the following command:
Connect-ExchangeOnline -UserPrincipalName youradmin@domain.comThis command will prompt you to enter your admin credentials, establishing a session with your Exchange Online environment.
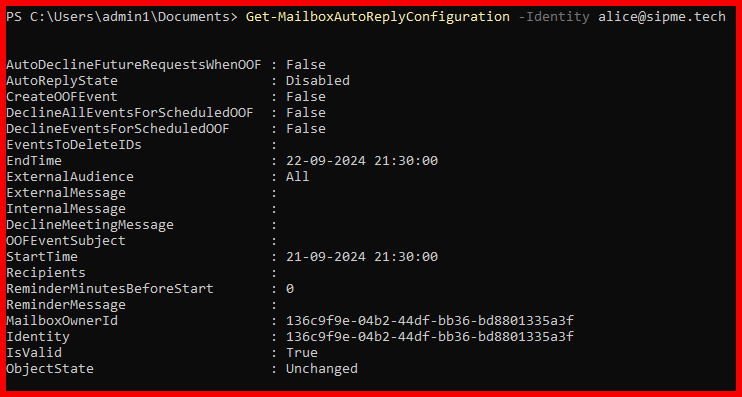
Step 3: Get the Automatic Replies status for a user
To get Automatic Replies status for a single user, we need to execute the below command. We can check the status whether Automatic replies is already enabled to the mailbox for which we are going to enable.
Get-MailboxAutoReplyConfiguration -Identity alice@sipme.techIn the below image, we can see Automatic replies status is disabled for this user. To enable this we need to execute the next below script.
Step 2: Set Automatic Replies for a Single User
To set automatic replies for a specific user, use the following command, replacing user@domain.com with the email address of the target user:
Set-MailboxAutoReplyConfiguration -Identity alice@sipme.tech -AutoReplyState Enabled -InternalMessage "I am currently out of the office until Sep 30. I will respond to your email as soon as possible." -ExternalMessage "Thank you for your email. I am out of the office and will return on Sep 30. For urgent matters, please contact abc@sipme.tech"Now after executing this script, we can see the Automatic Replies status got changed to enabled and automatic message replies we can see in the message part.

Step 3: Set Automatic Replies for Multiple Users
To set out-of-office replies for multiple users at once, you can create a script that applies the necessary configurations in bulk. This is particularly useful during busy seasons, such as holidays, when multiple staff members may be out simultaneously.
Here’s how you can do it:
Example PowerShell Script for Bulk Configuration
# Define an array of users
$users = @("user1@domain.com", "user2@domain.com", "user3@domain.com")

# Loop through each user to set automatic replies
foreach ($user in $users) {
    Set-MailboxAutoReplyConfiguration -Identity $user -AutoReplyState Enabled -InternalMessage "I am currently out of the office until [return date]. I will respond to your email as soon as possible." -ExternalMessage "Thank you for your email. I am out of the office and will return on [return date]. For urgent matters, please contact [alternative contact]."
}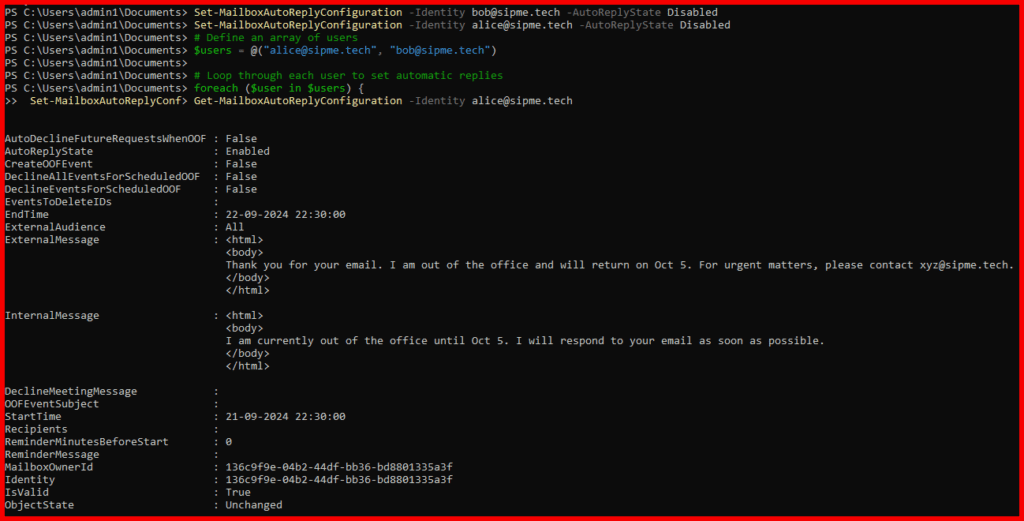
This script loops through the specified user email addresses and sets up the automatic replies for each one, saving you time and effort.
Step 4: Verify Automatic Replies
To check the current configuration of automatic replies for a specific user, run:
Get-MailboxAutoReplyConfiguration -Identity user@domain.comTo verify settings for multiple users, you can run this command in a loop:
foreach ($user in $users) {
    Get-MailboxAutoReplyConfiguration -Identity $user
}
This will display the settings for all users in the specified list.
Additional Considerations
Best Practices for Out-of-Office Messages
- Be Clear and Concise: Clearly state the dates of your absence and when you will return.
- Provide Alternative Contacts: Include contact information for someone who can assist in your absence.
- Maintain Professionalism: Avoid personal details and keep the message focused on work-related matters.
Troubleshooting Common Issues
If users are not receiving out-of-office replies, consider these troubleshooting steps:
- Check Permissions: Ensure that the user has the necessary permissions to set automatic replies.
- Review Spam Filters: Sometimes, external replies might end up in spam folders, particularly if the recipient’s email system has strict filtering rules.
- Email Routing: Verify that email routing is configured correctly within your organization.
Conclusion
Setting up out-of-office replies is essential for maintaining effective communication when you are unavailable. By utilizing both the Exchange Admin Center and PowerShell, you can ensure that your colleagues and clients are informed about your availability and can manage their expectations effectively.
Call to Action
For more insights into managing Exchange Online and optimizing your email communication, explore other articles on this blog, including the detailed guide on How to Install and Connect Exchange Online using PowerShell.
By implementing these practices, you can enhance your professional image and maintain seamless communication, even when you’re not available.
If you still thinking to explore more on this, please check out Microsoft official website by clicking here.