Managing mailbox storage in Exchange Online can be crucial as the volume of emails grows over time. One effective solution to avoid exceeding mailbox limits is to enable mailbox archiving. This allows emails to be moved from the primary mailbox to an archive mailbox, which provides additional storage and keeps the primary mailbox size manageable.
This post will walk you through how to enable mailbox archiving using PowerShell, a powerful tool for IT administrators to manage users and resources efficiently.
Prerequisites
Before enabling mailbox archiving through PowerShell, make sure you have:
- Exchange Online PowerShell module installed: If you haven’t set up the PowerShell module for Exchange Online, please follow my guide here: How to Install and Connect to Exchange Online Using PowerShell.
- Administrator access to the Exchange Online tenant where you need to manage the mailboxes.
Step 1: Connect to Exchange Online PowerShell
To start, you need to connect to Exchange Online using PowerShell. Here’s how you do that:
Connect-ExchangeOnline -UserPrincipalName <admin@yourdomain.com>Replace <admin@yourdomain.com> with your Microsoft 365 administrator account. This command will prompt you to authenticate, after which you’ll be connected to the Exchange Online environment.
Step 2: Check Archiving Status for a Mailbox
Before enabling the archive mailbox, it’s a good idea to check if archiving is already enabled for the user. You can do this by running the following command:
Get-Mailbox -Identity <UserPrincipalName> | Select-Object DisplayName,ArchiveStatus- Replace
<UserPrincipalName>with the actual email address of the user. - The
ArchiveStatuscan return one of the following values: - None: Archiving is not enabled.
- Active: Archiving is already enabled.
Example:
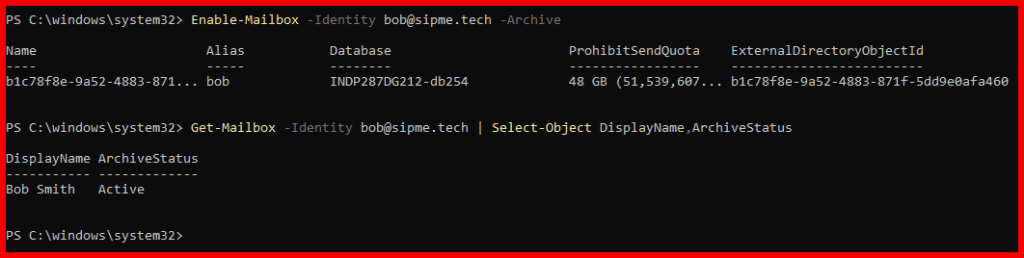
To check if archiving is enabled for bob@sipme.tech, use:
Get-Mailbox -Identity bob@sipme.tech | Select-Object DisplayName,ArchiveStatusIf the result shows None, you can proceed to enable archiving.

Step 3: Enable Archiving for a Single Mailbox
To enable archiving for a single user, use the following PowerShell command:
Enable-Mailbox -Identity <UserPrincipalName> -ArchiveExplanation:
- The
-Identityparameter specifies the mailbox for which archiving is being enabled. - The
-Archiveswitch triggers the creation of an archive mailbox for the specified user.
Example:
To enable archiving for bob@sipme.tech, the command will look like this:
Enable-Mailbox -Identity bob@sipme.tech -ArchiveOnce executed, an archive mailbox will be created for this user, providing additional storage for emails and keeping the primary mailbox size under control.
Step 4: Enable Archiving for Multiple Mailboxes
If you need to enable archiving for multiple users at once, you can use a batch process in PowerShell. This is especially useful in large organizations with multiple mailboxes to manage.
Example: Enable Archiving for All Users Without an Archive Mailbox
You can use the following command to enable archiving for all users who currently don’t have an archive mailbox:
Get-Mailbox -Filter {ArchiveStatus -Eq "None"} | Enable-Mailbox -ArchiveExplanation:
Get-Mailboxretrieves all mailboxes where theArchiveStatusis set toNone(meaning archiving is not enabled).Enable-Mailbox -Archiveis applied to all of these users, enabling the archive mailbox for each one.
Example: Enable Archiving Using a CSV File
You can also use a CSV file to enable archiving for a specific list of users. This method is useful when you have a pre-defined group of users you want to apply changes to.
- First, create a CSV file (
C:\Path\to\users.csv) with a column forUserPrincipalNamecontaining the email addresses of the users. Example CSV file:
  UserPrincipalName
  bob@sipme.tech
alice@sipme.tech- Use this script to enable archiving for the users listed in the CSV:
$users = Import-Csv "C:\Path\to\users.csv"
foreach ($user in $users) {
    Enable-Mailbox -Identity $user.UserPrincipalName -Archive
}
Explanation:
Import-Csvreads the CSV file into a variable$users.- The
foreachloop iterates through each user in the CSV file and enables the archive mailbox using theEnable-Mailbox -Archivecmdlet.
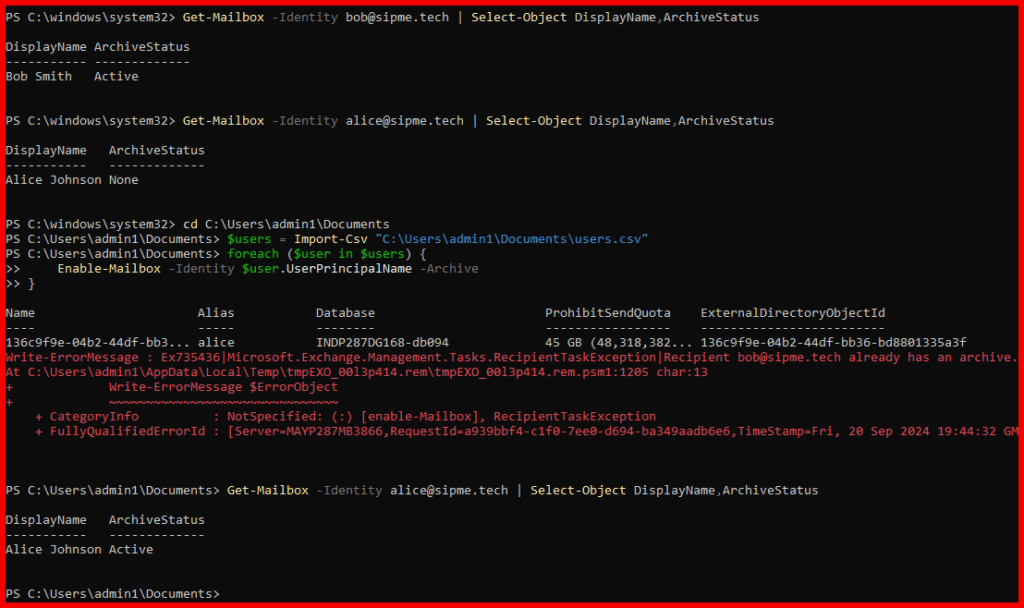
In this example, we tried enabling Online Archiving for two mailboxes (bob@sipme.tech, alice@sipme.tech) but for Bob we did just now so while executing this command its thrown an error saying for this user already enabled. And for user Alice, it got succeeded which we can see in the image.
Step 5: Verify Archiving is Enabled
After enabling the archive mailbox, it’s good practice to verify that it has been successfully enabled. You can check the status using the following command:
Get-Mailbox -Identity <UserPrincipalName> | Select-Object DisplayName,ArchiveStatusIf archiving is enabled, the ArchiveStatus will show Active.
Example:
To verify archiving for jane.smith@domain.com, run:
Get-Mailbox -Identity jane.smith@domain.com | Select-Object DisplayName,ArchiveStatusWhy Use PowerShell for Enabling Mailbox Archiving?
- Efficiency: PowerShell allows administrators to manage multiple mailboxes quickly, especially in larger environments.
- Automation: Tasks like enabling archiving for thousands of users can be scripted and automated with minimal manual effort.
- Scalability: For organizations with many users, PowerShell provides a scalable way to manage mailbox features, making it easier to apply changes across the board.
Conclusion
Enabling mailbox archiving in Exchange Online using PowerShell is a straightforward process that provides your users with additional storage and helps maintain efficient mailbox performance. PowerShell is a powerful tool for IT administrators who need to manage multiple users, allowing for automation and batch processing. By using these simple commands, you can quickly enable archiving and manage your organization’s mailbox storage effectively.
Don’t forget to check my detailed guide on How to Install and Connect to Exchange Online Using PowerShell to get started with PowerShell.