Basic tools in Linux refer to the essential command-line utilities that are commonly available on Linux systems. These tools are typically pre-installed and provide fundamental functionalities for managing and interacting with the system.
Here are the some basic tools in Linux
- find
- locate
- date
- time
- cal
- sleep
- gzip – gunzip
- zcate – zmore
The “find” command in basic tools in Linux is a powerful utility used to search for files and directories within a specified location and perform various actions on the matched files. It allows you to search based on different criteria like file name, size, modification time, and more.
The basic syntax of the find command is as follows:
find [path] [expression] Here, path is directory where the search will start. If not specified, the current directory is used as the starting point and expression specifies the search criteria and actions to be taken on the found files.
Here are some examples of using the “find” command:
Find all files with a specific name in the current directory and its sub-directories:

Find all directories in the “/home” directory:
Syntax: find /home -type d

Find files with a specific extension in a particular directory.
Syntax: find /path/to/directory -type f -name “*.log”
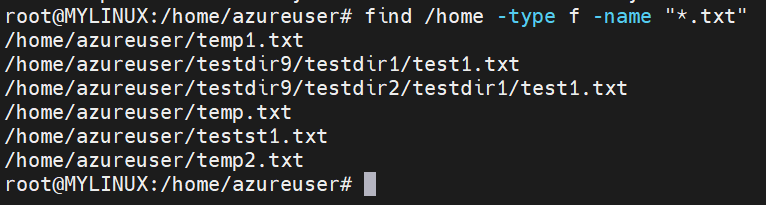
In the above example, we listed all ‘.txt’ file types.
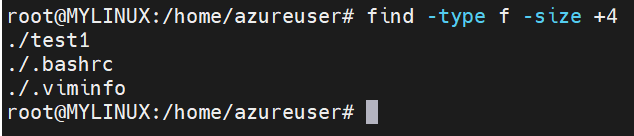
Find files larger than a specified size (e.g., 4KB):
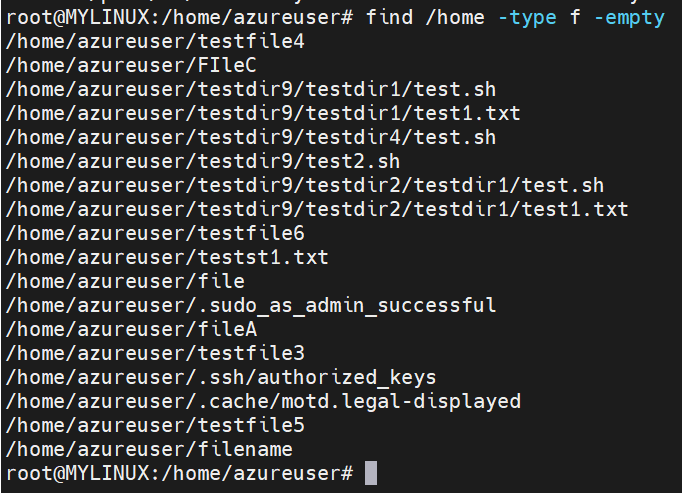
Find empty files in a directory:
Syntax: find /path/to/directory -type f -empty
Find files owned by a specific user:
Syntax: find /path/to/directory -type f -user username
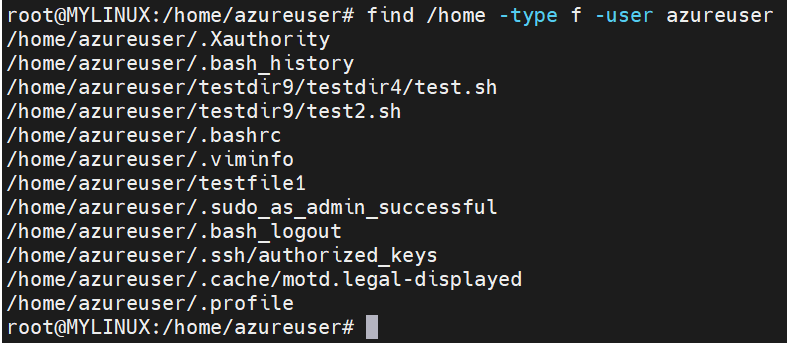
In the above example, ‘azureuser’ is user name whose files are listed here.
The “locate” command in basic tools in Linux is a fast and efficient utility used to search for files and directories by name. It relies on a pre-built database of file names and their corresponding paths, which makes it much faster than using the “find” command for large-scale searches.
Here’s how the “locate” command works:
Initial setup: Before you can use the “locate” command, you may need to set up the database by running the “updatedb” command with appropriate permissions. The “updatedb” command scans the file system and builds or updates the database used by “locate”.
Searching for files: Once the database is set up, you can use the locate command to search for files based on their names or patterns. The command syntax is straightforward:
Syntax: locate [options] pattern Here, pattern is the name or part of the name you want to search for. options are additional flags that modify the behavior of the command.
By default, locate searches for files and directories that match the specified pattern anywhere in their names.

We use “date” command in Linux to display or set the system date and time. It provides a straightforward way to retrieve and manipulate the current date and time information.
Here are some common uses of the “date command:
Display the current date and time:
Syntax: date

Display the date and time in a specific format:
Syntax: date +”%Y-%m-%d %H:%M:%S” (This will output the date and time in the format: “YYYY-MM-DD HH:MM:SS”)

Display the date and time in a different time zone:
Syntax: TZ=”America/New_York” date (This will show the date and time in the specified time zone, in this case, “America/New_York”.)
Set the system date and time:
Syntax: sudo date -s “2023-07-01 10:30:00” (This command sets the system date and time to the specified value. Note that this operation typically requires administrative privileges (hence the use of sudo).
Adjust the system date and time by a certain amount:
Syntax: sudo date –set=”+2 hours” (This command adds 2 hours to the current system time. You can use other time units like minutes, days, weeks, etc.)
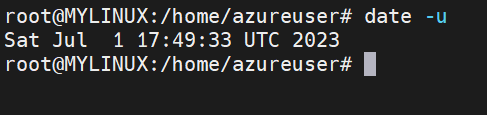
Display the date and time in UTC (Coordinated Universal Time):
Syntax: date -u (This will show date and time in UTC time zone)
The “time” command in basic tools in Linux is used to measure the execution time of a command or program. It allows you to determine how long a specific command takes to run, providing information on the user CPU time, system CPU time, and elapsed real time.

Here, ‘real’ refers to the real time, ‘user’ refers to the user CPU time, and ‘sys’ refers to the system CPU time. The time is measured in minutes (m) and seconds (s).
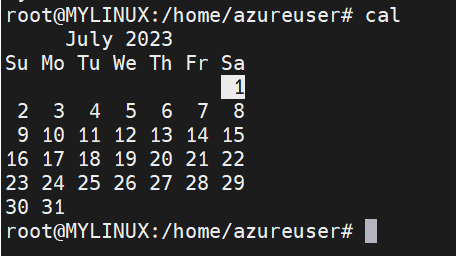
We use “cal” command in basic tools in Linux to display a calendar for a specific moth or year in the terminal. It provides a simple and convenient way to view the calendar without requiring any graphical interface.
The basic syntax of the cal command is as follows:
Syntax: cal [options] [month] [year]
Here are some examples of using the “cal” command:
Display the calendar for the current month:
Display the calendar for a specific month and year:
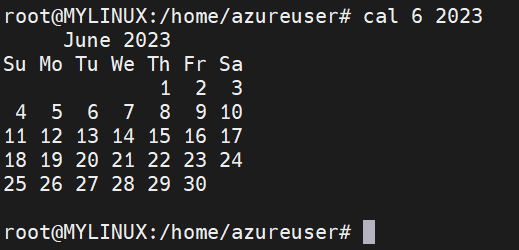
To see calendar for a complete year.
Syntax: cal 2023 (It will display calendar for all months of 2023)
The “sleep” command in Basic tools in Linux is used to introduce a delay or pause in the execution of a script or command. It allows you to wait for a specified amount of time before continuing with the next step in the script or program.
The basic syntax of the “sleep” command is as follows:
Syntax: sleep [duration] Here, duration is the time you want to pause the execution. It can be specified in seconds, minutes, hours, or a combination of them.
Pause the script execution for 5 seconds: sleep 5
Pause for 1 minute and 30 seconds: sleep 1m 30s
Pause for 2 hours: sleep 2h
The “gzip” and “gunzip” commands in Basic tools in Linux are used for file compression and decompression using the GNU zip (gzip) compression algorithm.
Here’s how you can use these commands:
To compress a file and replace it with a compressed version:
Syntax: gzip filename (This will compress the file filename and replace it with a compressed version named filename.gz.)
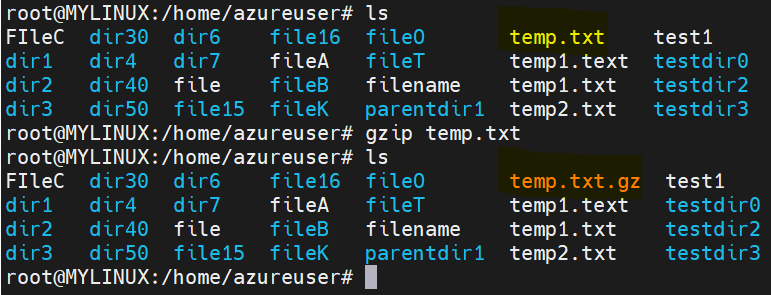
In the above example, we zipped a file named as temp.txt to temp.txt.gz.
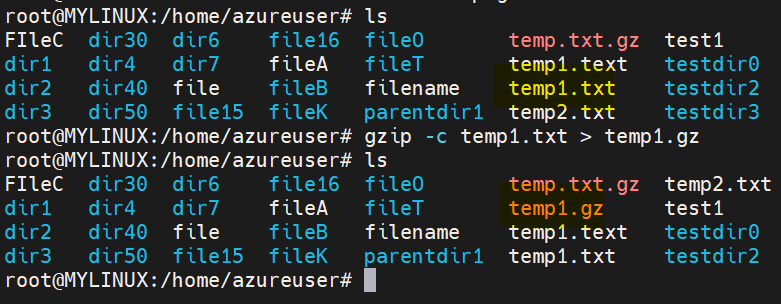
To compress a file and keep the original file:
Syntax: gzip -c filename > filename.gz This will compress the file filename and create a compressed version named filename.gz while keeping the original file intact.
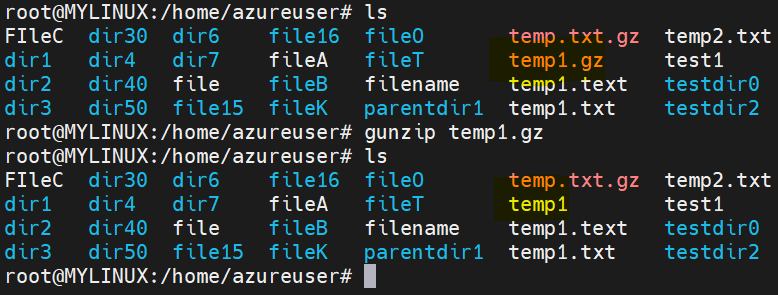
To decompress a compressed file and replace it with the original version:
Syntax: gunzip filename.gz (This will decompress the file filename.gz and replace it with the original file named filename.)
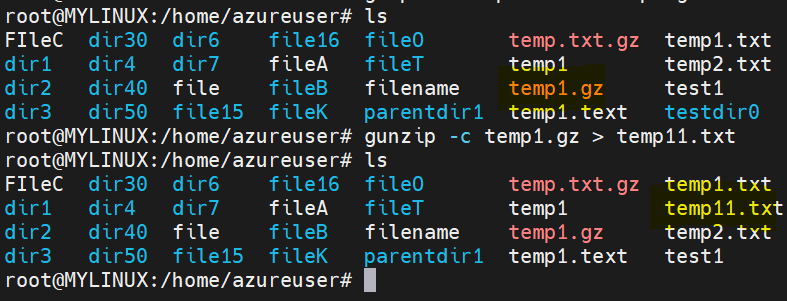
To decompress a compressed file and keep the original compressed file:
Syntax: gunzip -c filename.gz > filename (This will decompress the file filename.gz and create a decompressed version named filename while keeping the original compressed file intact.)
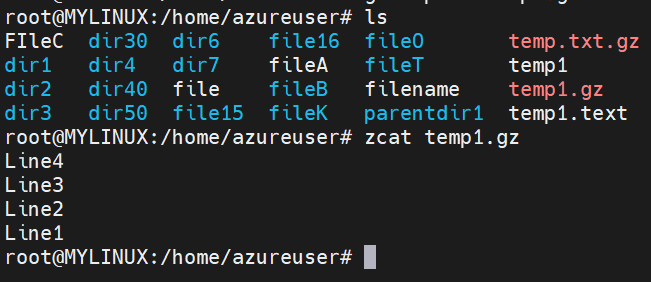
The “zcat” command in basic tools in Linux is used to display the contents of a compressed file (usually compressed using gzip) without actually decompressing it. It is essentially a combination of the “zcat” command and the cat command.
The basic syntax of the "zcat“ command is as follows:
Syntax: zcat filename.gz (This command will display the uncompressed content of the filename.gz file to the standard output (usually the terminal) without modifying the original compressed file.)
Wrapping Up
So, in this section we discussed on Basic tools in Linux along with its examples. Linux offers a wide range of command-line tools that enhance productivity. The find and locate commands assist in file searching, while date and time provide time-related information and measurement. The cal command displays calendars, while sleep introduces delays in script execution. gzip and gunzip handle file compression and decompression, and zcat and zmore allow viewing of compressed file contents. These tools contribute to efficient file management, time tracking, and data manipulation in the Linux environment. If you wish to learn more on this topic, please refer here or if you want to learn more on Linux basics commands, refer to this URL.
.