Onboarding new developers in a Linux environment can be a complex task, especially when it comes to managing user accounts and setting the appropriate permissions. In this detailed guide, we’ll walk you through the process of creating unique user accounts for five new developers, ensuring they have the specific permissions they need to perform their jobs effectively.
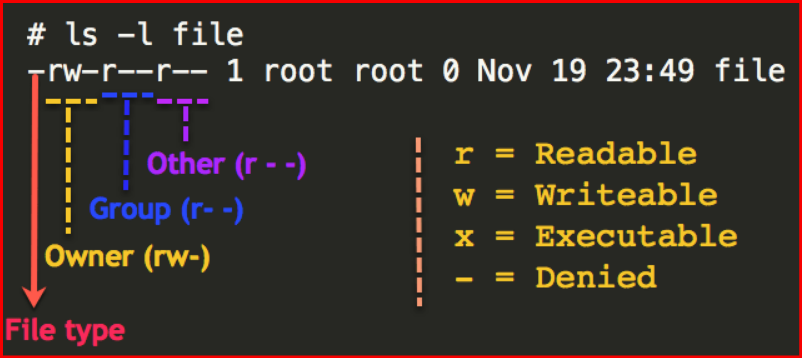
Table of Contents
Understanding User Accounts and Permissions
Before we dive into the steps for creating user accounts, it’s crucial to understand the concept of user accounts and permissions in Linux. Each user account has unique credentials and permissions that determine what actions a user can perform on the system.
Key Components of Linux User Management
- User ID (UID): A unique identifier for each user.
- Group ID (GID): Identifies the group the user belongs to.
- Home Directory: The directory where user-specific files are stored.
- Shell: The command-line interface the user interacts with.
The permission model allows you to control access at various levels:
- Read (r): Allows viewing files.
- Write (w): Allows modifying files.
- Execute (x): Allows running scripts or entering directories.
Step 1: Planning User Accounts
Before creating user accounts, you need to plan for the specifics. Gather information about each developer’s role and the permissions they will need. This could include:
- Access to specific directories.
- Permissions for certain applications or tools.
- Membership in specific groups (e.g., developers, admins).
Example Plan for New Developers
| Developer | UID | GID | Home Directory | Required Permissions |
|---|---|---|---|---|
| Alice | 1001 | dev | /home/alice | Read/Write to /projects |
| Bob | 1002 | dev | /home/bob | Read/Write to /projects |
| Charlie | 1003 | dev | /home/charlie | Read/Execute to /apps |
| Dave | 1004 | dev | /home/dave | Full Access to /data |
| Eve | 1005 | dev | /home/eve | Read/Write to /projects |
Step 2: Creating User Accounts
You can create user accounts in Linux using the useradd command. For each developer, you will run the command with appropriate options.
Example Commands to Create User Accounts
- Creating User Accounts:
   sudo useradd -m -d /home/alice -s /bin/bash -u 1001 alice
   sudo useradd -m -d /home/bob -s /bin/bash -u 1002 bob
   sudo useradd -m -d /home/charlie -s /bin/bash -u 1003 charlie
   sudo useradd -m -d /home/dave -s /bin/bash -u 1004 dave
   sudo useradd -m -d /home/eve -s /bin/bash -u 1005 eve
In these commands:
-mcreates the home directory.-dspecifies the home directory.-ssets the default shell.-usets the user ID.
- Setting Passwords: After creating the accounts, set passwords for each user:
   sudo passwd alice
   sudo passwd bob
   sudo passwd charlie
   sudo passwd dave
   sudo passwd eve
Step 3: Setting Permissions
Once the accounts are created, you need to set the appropriate permissions based on the earlier plan.
Example Commands for Setting Permissions
- Creating a Group for Developers: It’s good practice to create a dedicated group for developers:
sudo groupadd devThen, add the users to this group:
   sudo usermod -aG dev alice
   sudo usermod -aG dev bob
   sudo usermod -aG dev charlie
   sudo usermod -aG dev dave
sudo usermod -aG dev eve- Setting Directory Permissions: Create directories for projects and data, then set permissions:
   sudo mkdir /projects
   sudo mkdir /data
   sudo chown :dev /projects
   sudo chown dave /data
   sudo chmod 770 /projects
   sudo chmod 700 /data
chown :dev /projectssets the group ownership.chmod 770grants full permissions to the owner and group.
- Testing Access: Have each developer log in and test their access to the directories:
cd /projectsIf they can access the directory without issues, the permissions are set correctly!
Step 4: Documentation and Follow-Up
Document the user accounts, their permissions, and any specific configurations. This is invaluable for future reference and audits.
Creating a User Account Log
You might want to maintain a simple log file to track user accounts and permissions:
cat <<EOL >> /var/log/user_accounts.log
User: alice, UID: 1001, GID: dev, Home: /home/alice, Permissions: /projects
User: bob, UID: 1002, GID: dev, Home: /home/bob, Permissions: /projects
User: charlie, UID: 1003, GID: dev, Home: /home/charlie, Permissions: /apps
User: dave, UID: 1004, GID: dev, Home: /home/dave, Permissions: /data
User: eve, UID: 1005, GID: dev, Home: /home/eve, Permissions: /projects
EOL
Conclusion
Creating user accounts and setting permissions for new developers is a straightforward process when approached systematically. By understanding the requirements, planning accordingly, and executing with the right commands, you can ensure that each developer has the access they need to perform their tasks effectively.
For more in-depth tutorials and resources on Linux and DevOps tools, visit Geekers Hub.