Microsoft 365’s Exchange Online offers flexible mailbox storage options tailored to various user needs. While default mailbox sizes are sufficient for most users, there are scenarios where administrators may need to increase or customize mailbox sizes to meet organizational requirements.
This blog will walk you through the various methods to increase or customize mailbox sizes in Exchange Online, complete with examples and detailed steps to ensure you’re able to manage storage effectively.
Default Mailbox Sizes in Exchange Online
The default mailbox sizes in Exchange Online depend on the subscription plan:
- Microsoft 365 Business Basic/Standard/Premium: 50 GB per mailbox.
- Microsoft 365 E1: 50 GB.
- Microsoft 365 E3/E5: 100 GB.
- Exchange Online Plan 1: 50 GB.
- Exchange Online Plan 2: 100 GB with unlimited archive space.
While these limits cover most business needs, some users might require more storage or customized settings. Below are several methods to increase mailbox size or customize it for specific users.
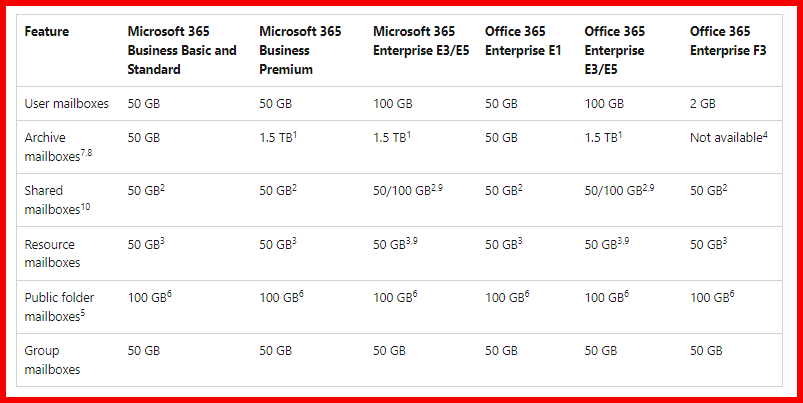
For more details on licenses, refer to the below image:
Method 1: Increasing Mailbox Size with License Upgrade
The easiest way to increase a user’s mailbox size is by upgrading their Microsoft 365 license. A higher-tier license, such as Microsoft 365 E3 or E5, increases the mailbox size from 50 GB to 100 GB and offers unlimited archiving.
Steps to Upgrade a User’s License:
- Sign in to the Microsoft 365 Admin Center.
- Go to Billing > Licenses.
- Find the user whose mailbox size you want to increase.
- Assign a higher license like Microsoft 365 E3 or E5.
By upgrading to E3 or E5, users will automatically get a 100 GB mailbox, and their archive storage will expand automatically as needed.
Method 2: Enabling Archive Mailbox to Expand Storage
Another method to effectively increase mailbox storage is by enabling the archive mailbox feature. This feature allows emails to be moved from the primary mailbox to an archive, which offers unlimited storage for users on plans such as E3 and E5.
Steps to Enable Archive Mailbox:
- Navigate to the Exchange Admin Center (EAC) from the Microsoft 365 Admin Center.
- Go to Recipients > Mailboxes.
- Select the user whose mailbox you want to archive.
- Click Enable Archive under the mailbox features tab.
Here are the reference screenshots:
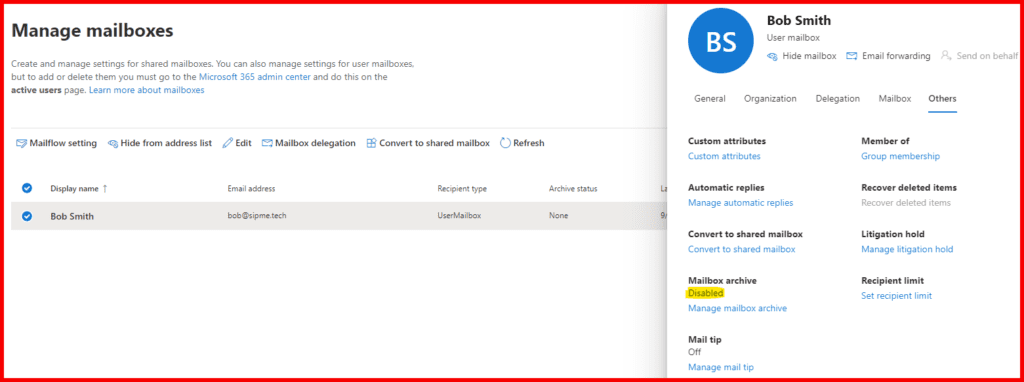
In this screenshot, we can see Mailbox Archive is not yet enabled. To enable this, just click on Manage mailbox archive and turn the toggle button ON for Enabled. While saving it, give a name which will be reflecting to user’s mailbox.
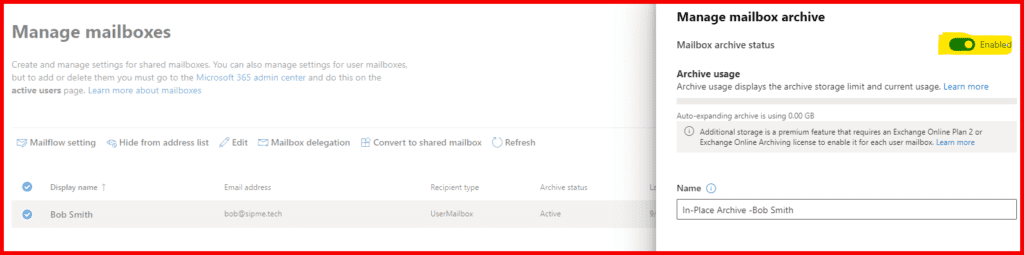
Once enabled, old emails can be automatically moved to the archive based on retention policies, freeing up space in the user’s primary mailbox. You can also set policies to automatically archive emails after a specific time period (e.g., two years).
If you want to do it through PowerShell, please refer my another blog post How to Enable Mailbox Archiving in Exchange Online Using PowerShell.
Method 3: Increasing Mailbox Quota Using PowerShell
For administrators managing a large number of mailboxes, using PowerShell to increase mailbox sizes is a powerful option. This allows for greater control and automation.
Before proceeding, if you’re unfamiliar with PowerShell, please refer to my blog on How to Install and Connect to Exchange Online Using PowerShell to get connected.
Step 1: Check Current Mailbox Quota
Once connected, you can check a user’s current mailbox quotas using the following command:
Get-Mailbox <UserPrincipalName> | Select-Object DisplayName,ProhibitSendQuotaThis command returns the user’s display name and the limit at which they cannot send more emails (ProhibitSendQuota).
Example:
Get-Mailbox john.doe@domain.com | Select-Object DisplayName,ProhibitSendQuotaThis example checks John Doe’s mailbox to see the current send quota.
Step 2: Increase/Decrease Mailbox Quota
To decrease the mailbox size, use the Set-Mailbox cmdlet to adjust the user’s quota. Here’s an example:
Set-Mailbox john.doe@domain.com -ProhibitSendReceiveQuota 45GB -ProhibitSendQuota 45GB -IssueWarningQuota 40GBIn this command:
- ProhibitSendReceiveQuota 45GB: The user cannot send or receive emails once their mailbox hits 45 GB.
- ProhibitSendQuota 45GB: The user cannot send emails once their mailbox hits 45 GB.
- IssueWarningQuota 40GB: The user receives a warning when their mailbox reaches 40 GB.
Example:
If you want to increase Bob’s mailbox to 45GB, here’s how:
Set-Mailbox bob@sipme.tech -ProhibitSendReceiveQuota 45GB -ProhibitSendQuota 45GB -IssueWarningQuota 40GB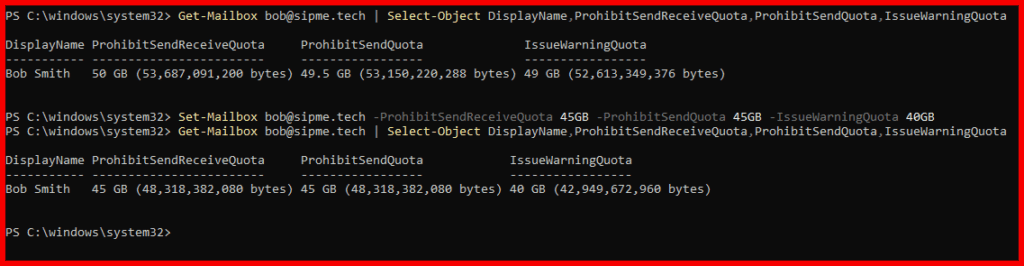
In this image, we can see the default mailbox size for ProhibitSendReceiveQuota is 50GB, ProhibitSendQuota is 49.5GB and IssueWarningQuota 49GB. It means when Bob mailbox size reaches this limit, will not be able to send/receive emails.
Similarly many organization wants not to give default value to the users in that case we can execute this command to decrease the mailbox sizes or limit the mailbox quotas.
Method 4: Customize Mailbox Size for Specific Users
In some cases, certain users may need custom mailbox settings. This can be done through PowerShell.
- Issue Warning: The storage limit at which a warning will be sent to the user.
- Prohibit Send: The limit at which the user cannot send emails.
- Prohibit Send/Receive: The limit at which the user cannot send or receive emails.
Example:
For the above user, bob@sipme.tech, now we want to increase the mailbox size based on the below quotas:
- Issue Warning at 45GB
- Prohibit Sending at 48GB
- Prohibit Sending/Receiving at 48GB
So the script is as below:
Set-Mailbox bob@sipme.tech -ProhibitSendReceiveQuota 48GB -ProhibitSendQuota 48GB -IssueWarningQuota 45GB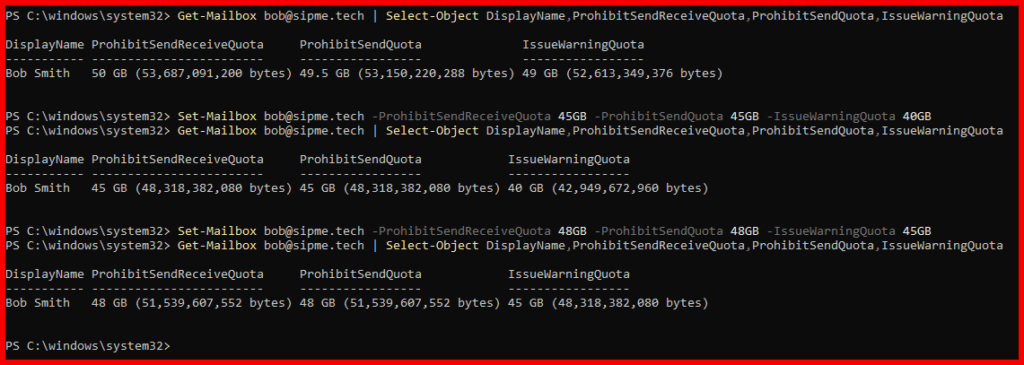
In this image we can see the mailbox quotas changed based on the above mentioned details.
Conclusion
There are several ways to increase or customize mailbox size in Exchange Online depending on your organization’s needs:
- Upgrade Licenses: Increase mailbox size by upgrading to higher Microsoft 365 licenses.
- Enable Archive Mailboxes: Offload old emails to an archive to expand primary mailbox capacity.
- Use PowerShell: Manually set mailbox limits for individual users or customize storage for VIPs and employees with heavy email usage.
By leveraging these methods, administrators can ensure users have the mailbox space they need without running into storage issues. Choose the approach that best fits your organization’s requirements and scale your storage efficiently.
If you’re using PowerShell, don’t forget to check out How to Install and Connect to Exchange Online Using PowerShell for step-by-step instructions on setting up your environment.